|
|
 | |
 카다로그 PDF » 카다로그 PDF »
재고: 1대 |
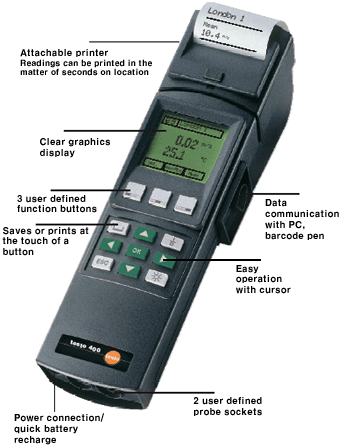
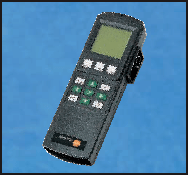
The reference for HVAC units, testo 400

| testo 400 |
| Multi-function measuring instrument, incl. battery, Li cell and cal. protocol Used for: |
| ● Velocity, volume flow |
| ● Humidity, pressure |
| ● Temperature |
| ● CO2, rpm and current/velocity |
| Part no. 0563 4001 2,537,000 원 | |

Precision reference class measuring instruments have everything the professional user needs to complete complicated measurement tasks efficiently, accurately and conveniently.
testo 400 includes the parameters temperature, CO2, rpm, current, voltage, relative humidity, pressure, velocity and volume flow.
Intelligent electronics ensure the latest technology is used thanks to software updates. The measuring instrument can always keep up with the measurement tasks at hand thanks to upgrades.
Upgradable and teachable, highly reliable and of the highest quality - they are the properties which guarantee that the customer is equipped for the future.
Useful instrument functions:
● System accuracy up to 0.05 °C and up to a
resolution of 0.001 °C
● All functions of testo 650 and testo 950
● Input of cross-sections to volume flow calculation
● Absolute pressure compensation in thermal probes
● Density calculation for velocity measurement with reference to temperature, humidity and absolute pressure
● Turbulence degree meas. to DIN EN 27726, DIN 1946 Part 2, ISO
● Assessment of volume flow measurements with calculation of total inaccuracy of measurement in accordance with EN 12599 with VAC module (optional) |
Ordering data

testo 400, multi-function measuring instrument,
incl. battery, Li cell and calibration protocol
Part no.0563 4001 2,537,000 원 |

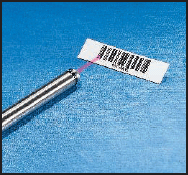
Barcode pen to read in measurement locations
Quick and accurate allocation of reading to location
Part no. 0554 0460 890,000 원 |

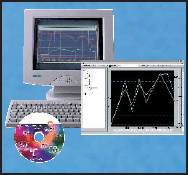
ComSoft 3 - Professional with data management
Incl. database, analysis and graphics function, data analysis, trend curve
Part no. 0554 0830 617,000 원 |

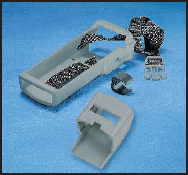
SoftCase (protects instrument from impact) with carrier strap, magnetic holder and probe holder
Part no. 0516 0401 214,000 원
SoftCase for attachable printer (protects printer from dirt/impact)
Part no. 0516 0411 102,000 원 |

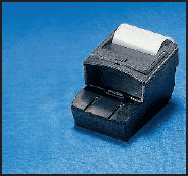
Attachable printer (securely attached) with 1 roll of thermal paper and batteries
Quickly prints readings on location
Part no. 0554 0570 875,000 원 |

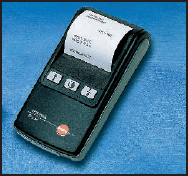
Testo printer with 1 roll of thermal paper and 4 AA size batteries
Part no. 0554 0545 456,000 원
※testo 575 fast printer, incl. 1 roll of thermal paper and batteries
Part no. 0554 1775 780,000 원 |

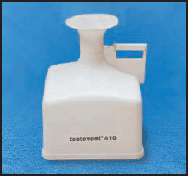
testovent 410, volume flow funnel, Ø 340mm/330 x 330mm, incl. case
Part no. 0554 0410 578,000 원
testovent 415, volume flow funnel, Ø 210mm/190x190mm, incl. case
Part no. 0554 0415 504,000 원 |

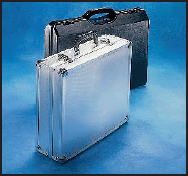
System case (plastic)
Part no. 0516 0400 367,000 원
System case (aluminium)
Part no. 0516 0410 569,000 원 |
| Measuring instrument |
Part no. |
testo 400, multi-function measuring instrument, incl. battery, Li cell and calibration protocol
2 channel multi-function measuring instrument |
0563 4001
2,537,000원 |
Accessories
for measuring instrument |
Part no. |
Memory upgrade to 500,000 readings
Upgrades memory capacity (via service) |
0554 9481
938,000 원 |
Rechargeable battery set for instrument (4 rechargeables 2.4V/700mAh)
Selected for quick recharging in instrument |
0554 0196
77,000 원 |
Mains unit 230 V/ 8 V/ 1 A, for instrument (European plug)
For mains operation and battery recharging |
0554 1084
86,000 원 |
Car charging adapter, ready to measure following recharging in car
Battery is recharged while travelling in car |
0554 0424
54,000 원 |
Spare Li cell to save RAM data
When changing battery or rechargeable battery |
0515 0028
6,000 원 |
| Printer and accessories |
Part no. |
| Attachable printer (securely attached) with 1 roll of thermal paper and batteries |
0554 0570
875,000 원 |
Testo printer with 1 roll of thermal paper and 4 AA size batteries
Prints readings on location |
0554 0545
456,000 원 |
※testo 575 fast printer, incl. 1 roll of thermal paper and batteries
Infrared thermal line printer with graph function |
0554 1775
780,000 원 |
Recharger for printer (with 4 standard rech. batt.)
Rechargeable batteries are recharged externally |
0554 0110
132,000 원 |
| Spare thermal paper for printer (6 rolls) |
0554 0569
38,000 원 |
Spare thermal paper for printer (6 rolls)
Measurement data documentation legible for up to 10 years |
0554 0568
43,000 원 |
| Label thermal paper (Testo patent) for testo 575 printer (6 rolls), can be applied directly |
0554 0561
72,000 원 |
|
|
| Softcase for instrument and printer |
Part no.. |
| SoftCase (protects instrument from impact) with carrier strap, magnetic holder and probe holder |
0516 0401
214,000 원 |
| SoftCase for attachable printer (protects printer from dirt/impact) |
0516 0411
102,000 원 |
| Barcode and accessories |
Part no. |
Barcode pen to read in measurement locations
Quick and accurate allocation of reading to location |
0554 0460
890,000 원 |
Barcode labels, self-adhesive (1200 off)
Location marked with barcode, printed using software |
0554 0411
89,000 원 |
| Adhesive pockets (50 off) for printout, paper barcode labels... |
0554 0116
115,000 원 |
| Software and accessories |
Part no. |
ComSoft 3 - Professional with data management
Incl. database, analysis and graphics function, data analysis, trend curve |
0554 0830
617,000 원 |
RS232 cable
Connects instrument to PC (1.8 m) for data transfer |
0409 0178
82,000 원 |
| Electrical isolation for RS232 (connects measuring instrument to PC) |
0554 0006 |
| VAC module |
Part no. |
Memory upgrade to 500,000 readings
Upgrades memory capacity (via service) |
0554 9481
938,000 원 |
VAC module upgrade
Volume flow calculation in ducts with error calculation function in instrument |
0450 4010
428,000 원 |
VAC module upgrade, PC software, (for ComSoft 3 software)
Printout of standard measurement protocols |
0554 4030
594,000 원 |
| Refrigeration module |
Part no. |
| Refrigeration technology" update with saved curves of all usual refrigerants |
0554 4035
311,000 원 |
| System case |
Part no. |
| Transport case (plastic) for measuring instrument, probes |
0516 0300
148,000 원 |
System case (plastic) for measuring instrument, probes and accessories
Probes in lid make it easy to find parts in case |
0516 0400
367,000 원 |
System case (aluminium) for measuring instrument, probes and accessories
Probes in lid make it easy to find parts in case |
0516 0410
569,000 원 | | Calibration certificates
| Calibration certificates/Temperature |
Part no. |
ISO calibration certificate/Temperature
For air/immersion probes, calibration points -18°C; 0°C; +60°C |
0520 0001
204,000 원 |
ISO calibration certificate/Temperature
Measuring instruments with air/immersion probe; calibration points 0°C; +150°C; +300°C |
0520 0021
230,000 원 |
ISO calibration certificate/Temperature
Thermometers with surface probe; calibration points +60°C; +120°C; +180°C |
0520 0071
255,000 원 |
DKD calibration certificate/Temperature
Meas. instr. with air/immersion probe; calibration points -20°C; 0°C; +60°C |
0520 0211
714,000 원 |
DKD calibration certificate/Temperature
Contact surface temperature probes; calibration points +100°C; +200°C; +300°C |
0520 0271
969,000 원 |
| Calibration certificates/Humidity |
Part no. |
ISO calibration certificate/Humidity
Calibration points freely selectable from 5 to 95 %RH
+15 to +35 °C (max DP +70 °C/min DP -30 °C)
-18 to +80 °C |
0520 0106 |
ISO calibration certificate/Humidity
Electronic hygrometers; calibration points 11.3%RH and 75.3%RH at +25°C |
0520 0006
242,000 원 |
ISO calibration certificate/Humidity
Pressure dew point measuring instruments; calibration points freely selectable
-40 to 0 °C at 6 bar |
0520 0116 |
ISO calibration certificate/Humidity
Saturated saline solutions: calibration point 11.3%RH |
0520 0013
191,000 원 |
ISO calibration certificate/Humidity
Saturated saline solutions, calibration point 75.3%RH |
0520 0083
191,000 원 |
DKD calibration certificate/Humidity
Electronic hygrometers; calibration points 11.3%RH and 75.3%RH at +25°C |
0520 0206
650,000 원 |
DKD calibration certificate/Humidity
Calibration points freely selectable from 5 to 95%RH
+25°C
-18 to +70°C |
0520 0216 |
DKD calibration certificate/Humidity
Saturated saline solutions; calibration point 11.3%RH |
0520 0213
332,000 원 |
DKD calibration certificate/Humidity
Saturated saline solutions; calibration point 75.3%RH |
0520 0283
332,000 원 | |
|
| Calibration certificates/Pressure |
Part no. |
ISO calibration certificate/Pressure
Absolute pressure; 5 pt. distributed over the whole measurement range |
0520 0115
191,000 원 |
ISO calibration certificate/Pressure
Differential pressure; 5 points distributed over meas. range (-1 to 250 bar) |
0520 0005
191,000 원 |
DKD calibration certificate/Pressure
Differential and positive pressure; 6 measuring points distributed over meas. range (> 0.6% of fsv) |
0520 0225
255,000 원 |
DKD calibration certificate/Pressure
Absolute pressure; 11 measuring points distributed over meas. range (0.1 to 0.6% of fsv) |
0520 0212
612,000 원 |
DKD calibration certificate/Pressure
Differential and positive pressure; 11 measuring points distributed over the instrument measuring range |
0520 0215
395,000 원 |
| Calibration certificates/Velocity |
Part no. |
ISO calibration certificate/Velocity
All velocity probes, calibration points selectable from 0.3 to 50 m/s at +25°C |
0520 0104 |
ISO calibration certificate/Velocity
Hot wire, vane anemometer, Pitot tube; calibration points 1; 2; 5; 10 m/s |
0520 0004
268,000 원 |
ISO calibration certificate/Velocity
Hot wire, vane anemometer, Pitot tube; calibration points 5; 10; 15; 20 m/s |
0520 0034
268,000 원 |
ISO calibration certificate/Velocity
Hot wire, vane anemometer; calibration points 0.5; 0.8; 1; 1.5 m/s |
0520 0024
332,000 원 |
DKD calibration certificate/Velocity
Hot wire, vane anemometer; calibration points 0.5; 1; 2; 5; 10 m/s |
0520 0244
714,000 원 |
DKD calibration certificate/Velocity
Hot wire, vane anemometer, Pitot tube; calibration points 2; 5; 10; 15; 20 m/s |
0520 0204
714,000 원 |
DKD calibration certificate/Velocity
Hot wire anemometer; calibration points 0.1; 0.2; 0.5; 0.8; 1 m/s |
0520 0224
842,000 원 | | Suitable probes at a glance
 |
| Part no. |
| |
0610 9714
393,000 원 | |
 |
| |
0604 9773
423,000 원 |
0628 0017
750,000 원 | |
 |
| |
0604 9794
423,000 원
0614 9794
464,000 원 |
0644 1109
166,000 원 |
0600 1693
161,000 원 | |
 |
| |
| |
0604 0194
303,000 원
0614 0194 |
0604 0994
319,000 원 |
0604 9993
250,000 원
0614 9993
293,000 원 | |
 |
0604 9893
250,000 원
0614 9893
293,000 원 |
0600 0394
449,000 원 |
0600 5093
2,321,000 원 |
0600 4793
319,000 원 | |
 |
0600 4893
339,000 원 |
0600 1494
487,000 원 |
0644 1607
159,000 원 |
0600 1693
161,000 원 | |
 |
| |
0604 9973
390,000 원
0628 0018
444,000 원 | |
| Accessories |
|
Silicone heat paste (14g), Tmax = +260°C
Improves heat transfer in surface probes |
0554 0004
19,000 원 | *with EEPROM: Precision adjustment for each probe at a measuring point; measuring range limits are saved in probe;
t95 extrapolation; surface allowance in surface probe can be adapted to measuringSuitable probes at a glance
 |
| Part no. |
| |
0600 4593
288,000 원 |
0602 0092
86,000 원 |
| |
0628 0019
405,000 원 | |
 |
| Part no. |
| |
0604 0293
288,000 원
0614 0293
326,000 원 |
0604 0493
219,000 원
0614 0493
258,000 원 |
0604 0593
288,000 원
0614 0593
324,000 원 |
0604 9794
423,000 원
0614 9794 |
0600 2593
607,000 원 |
0600 5993
1,262,000 원 |
| 0363 1712 | |
 |
| |
0604 0273
332,000 원 |
0604 0274
377,000 원 |
0614 0240
960,000 원 |
0628 0015
706,000 원 |
0628 0016
811,000 원 |
0604 2573
439,000 원 | |
 |
| Part no. |
0600 5393
186,000 원 |
0600 5493
207,000 원 |
0600 5793
230,000 원 |
0600 5893
273,000 원 |
0600 5593
423,000 원 | | *with EEPROM: Precision adjustment for each probe at a measuring point; measuring range limits are saved in probe;
t95 extrapolation; surface allowance in surface probe can be adapted to measuring taskSuitable probes at a glance
 |
| Part no. |
0554 0670
890,000 원 |
| Part no. |
0632 1247
890,000 원 |
0632 1240
1,145,000 원 |
0640 0340
732,000 원 |
0554 0007
380,000 원 | |
| Accessories for temperature probes |
Part no. |
Cable, 1.5 m long, connects probe with plug-in head to meas. instrument
PUR coating material |
0430 0143
89,000 원 |
Cable, 5 m long, connects probe with plug-in head to measuring instrument
PUR coating material |
0430 0145
143,000 원 |
Extension cable, 5 m long, between plug-in head cable and instrument
PUR coating material |
0409 0063
189,000 원 | |
|
| Accessories for temperature probes |
Part no. |
Telescopic handle, max. 1 m, for probe with plug-in head
Cable: 2.5 m long, PUR coating material |
0430 0144
548,000 원 |
Glass pipe for immersion/penetration probe to protect from corrosive agents
For probes with Part nos. 0604 0273 and 0628 0015 |
0554 7072
65,000 원 |
| |
| |
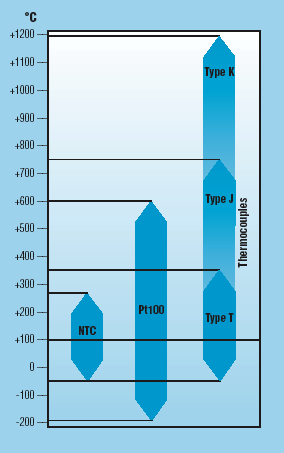
Selecting the right temperature sensor
Measuring range

|
Accuracy
Select the sensor with the accuracy required for your application from the diagram or table.
| Accuracy data |
| Sensor |
Temp.
range |
Class |
Maximum tolerances |
| Fixed value |
Referred to temperature |
Thermocouple
Type K (NiCr-Ni) |
-40...+1200 °C |
2 |
±2,5 °C |
±0,0075 x ltl |
| -40...+1000 °C |
1 |
±1,5 °C |
±0,004 x ltl |
| Type T |
-40...+350 °C |
1 |
±0,5 °C |
±0,001 x ltl |
| Type J |
-40...+750 °C |
1 |
±1,5 °C |
±0,004 x ltl |
| Pt100 |
-100...+200 °C |
B |
± (0,3 + 0,005 ● ItI) |
| -200...+600 °C |
A |
± (0,15 + 0,002 ● ItI) |
NTC
(Standard) |
-50...-25,1 °C
-25...+74,9 °C
+75...+150 °C |
- |
±0.4 °C
±0.2 °C
±0.5 % of reading |
NTC
(High temp.) |
-30...-20,1 °C
-20...0 °C
+0,1...+75 °C
+75,1...+275 °C |
-
- °C |
±1 °C
±0.6 °C
±0.5 °C
±0.5 °C ±0.5 % of reading |
| Data for thermocouples to EN 60584-1 (formerly IEC 584-1). Two values are given. One fixed value in °C and a formula. |
The larger value always applies. Data for Pt100 to EN 60751 (formerly IEC 751). |
There is no standardization for NTC sensors. | | | Suitable probes at a glance
 |
| Part no. |
| |
0636 9740
750,000 원 |
0636 9715
857,000 원 |
0636 2130
1,148,000원 |
0636 9741
1,117,000원 |
0636 9742
816,000 원 | |
 |
| |
0636 9840
2,708,000원 |
0636 9841
3,290,000원 |
0636 2142
1,698,000원 |
0628 0021
1,999,000원 |
0628 0022
2,086,000원 | |
 |
| |
0628 0013
1,698,000원 |
0636 0340
1,415,000원 |
0636 2140
1,275,000원 |
0636 0365
1,183,000원 |
0636 0565
370,000 원 | |
| * in the temperature range from +10°C to +30°C |
 |
| Part no. |
0638 1345
1,250,000원 |
0638 1445
1,015,000원 |
0638 1545
905,000 원 |
0638 1645
905,000 원 |
0638 1740
882,000 원 |
0638 1840
882,000 원 |
0638 1940
882,000 원 | | Suitable probes at a glance
 |
| Part no. |
0554 0665
94,000 원 |
0554 0755
77,000 원 |
0554 0667
38,000 원 |
0554 0757
99,000 원 | |
 |
0554 0666
94,000 원 |
0554 0756
79,000 원 |
0554 0640
77,000 원 |
0554 0647
67,000 원 |
0554 1031
107,000 원 | |
| Accessories for humidity probes/sensors |
Part no. |
Cable, 1.5 m long, connects probe with plug-in head to meas. instrument
PUR coating material |
0430 0143
89,000 원 |
Cable, 5 m long, connects probe with plug-in head to measuring instrument
PUR coating material |
0430 0145
143,000 원 |
Extension cable, 5 m long, between plug-in head cable and instrument
PUR coating material |
0409 0063
189,000 원 |
Telescopic handle, max. 1 m, for probe with plug-in head
Cable: 2.5 m long, PUR coating material |
0430 0144
548,000 원 |
| Telescopic handle, 340 - 800mm long |
0430 9715
301,000 원 |
Adapter for surface humidity measuring, for humidity probes Ø 12mm
Locates damp spots on walls, for example |
0628 0012
92,000 원 |
Cap for bore holes, for humidity probe with 12mm diameter
Measures equilibrium moisture in bore holes |
0554 2140
87,000 원 |
Control and humidity adjustment set 11.3%RH/75.3%RH incl. adapter for humidity probes
|
0554 0660
487,000 원 |
| Control and storage humidity (33%RH) for humidity probes |
0554 0636
216,000 원 | |
|
| Accessories for pressure probes |
Part no. |
| Connection cable for pressure probes 0638 1740, 0638 1840, 0638 1940 |
0409 1745
201,000 원 |
Magnetic holder for pressure probes
For pressure probes 0638 1345/..1445/..1545/..1645 |
0554 0225
138,000 원 |
| Adapter for pressure probes, 1/2" outer thread, 1/4" inner thread |
0699 3127 |
| |
|
| |
|
| |
|
| |
|
| |
|
| |
| |
 |
Suitable probes at a glance
 |
| Part no. |
0635 9443
1,502,000 원 |
0635 9540
1,556,000 원 |
0635 9640
1,464,000 원 |
0635 9440
1,015,000 원 |
0635 9340
1,145,000 원 |
0628 0036
1,313,000 원 |
0635 6045
5,865,000 원 | |
| Accessories/Vane probes |
Part no. |
| Professional telescopic handle for plug-in vane probes, max. 1 m long, extension on request |
0430 0941
543,000 원 |
Extension for telescopic handle, 2 m long
Please also order the 0409 0063 extension cable |
0430 0942
316,000 원 |
| Handle for plug-in vane probes |
0430 3545 | |
|
| Accessories/Vane probes |
Part no. |
| Swan neck, flexible connection between probe and connection part |
0430 0001
584,000 원 |
| Magnetic probe holder for vane probes |
0554 0430
250,000 원 |
| |
| |
 |
| Part no. |
0628 0035
1,030,000 원 |
0635 1549
857,000 원 |
0635 1049
1,145,000 원 |
0635 1041
1,145,000 원 | |
 |
| Part no. |
| |
0638 1345
1,250,000 원 |
0638 1445
1,015,000 원 |
0638 1545
905,000 원 | |
 |
| |
0635 2245
518,000 원 |
0635 2145
245,000 원 |
0635 2045
275,000 원 |
0635 2345
711,000 원 | | Suitable probes at a glance
 |
| Part no. |
| |
0635 2040
474,000 원 |
0635 2140
558,000 원 |
0635 2240
834,000 원 | |
| Accessories for pressure probes |
Part no. |
Connection hose, silicone, 5m long
Silicone hose connects Pitot tube and pressure probe, 5 m long |
0554 0440
72,000 원 | |
|
| Accessories for pressure probes |
Part no. |
Magnetic holder for pressure probes
For pressure probes 0638 1345/..1445/..1545/..1645 |
0554 0225
138,000 원 | |
 |
| |
0635 1540
1,484,000원 |
0628 0009
1,489,000원 |
0635 8888
ID No.
0699 4239/ | |
| Accessories for 3-function probe |
Part no. |
Adapter for humidity adjustment of 3-function probe 0635 1540
Order with adjustment set |
0554 0661 | |
|
| Accessories for 3-function probe |
Part no. |
Cable, 1.5 m long, connects probe with plug-in head to meas. instrument
PUR coating material |
0430 0143
89,000 원 | |
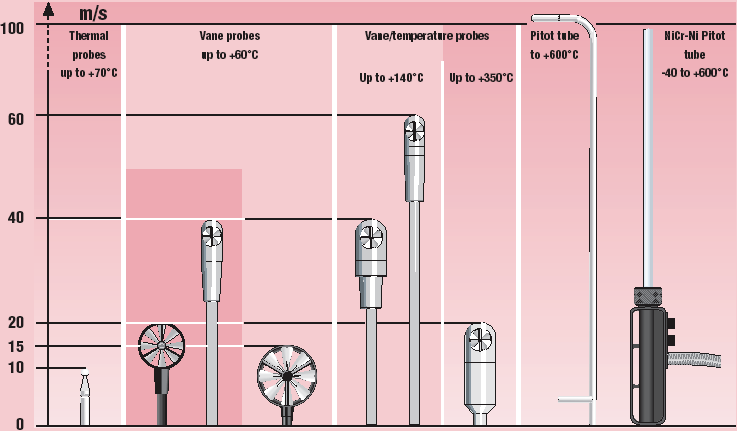
Measuring and application ranges of velocity probes
 | | For fast measurements on VAC systems
testo 400 with its VAC module is
currently the only measuring system worldwide with which a quick and objective assessment of the functionality of a VAC system can be carried out without the need for any additional calculations. Measurement stipulations are based on internationally recognised standards;
VDI 2080 in Germany, the 12599 Draft EN standard for Europe as well as Ashrae in the US. These are the first automated measurement procedures which fulfill the requirements of these standards.
The testo 400 measuring instrument is simply positioned on the ventilation duct via a magnetic holder which means that the user always has one
hand free. The location data which includes location name, measurement coordinates, duct area, correction factor etc. are automatically read into the measuring instrument.
The measurement data saved in testo 400 is transmitted to your PC at the touch of a button. Time-consuming writing is eliminated, the calculations
are done automatically by testo 400. The measurement results are printed using a VDI or EN standard layout. |

 |

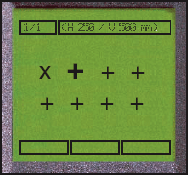
Assessment of measurement directly on location with integrated uncertainty calculation

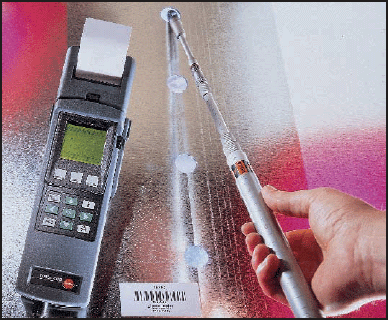
The coordinates required for the grid measurement are shown in the instrument display. The depth information on the vane telescopic handle makes the task that much
easier in practice.
|
| Recommended kit: |
Part no. |
| testo 400, multi-function measuring instrument, incl. battery, Li cell and calibration protocol |
0563 4001
2,537,000 원 |
Memory upgrade to 500,000 readings
Upgrades memory capacity (via service) |
0554 9481
938,000 원 |
VAC module upgrade
Volume flow calculation in ducts with error calculation function in instrument |
0450 4010
428,000 원 |
ComSoft 3 - Professional with data management
Incl. database, analysis and graphics function, data analysis, trend curve |
0554 0830
617,000 원 |
VAC module upgrade, PC software, (for ComSoft 3 software)
Printout of standard measurement protocols |
0554 4030
594,000 원 |
RS232 cable
Connects instrument to PC (1.8 m) for data transfer |
0409 0178
82,000 원 |
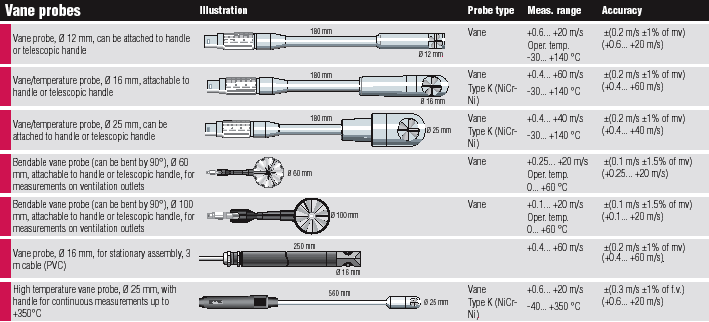
| Bendable vane probe (can be bent by 90°), Ø 100 mm, attachable to handle or telescopic handle, for measurements on ventilation outlets |
0635 9340
1,145,000 원 |
| Vane/temperature probe, Ø 16 mm, attachable to handle or telescopic handle |
0635 9540
1,556,000 원 |
| Professional telescopic handle for plug-in vane probes, max. 1 m long, extension on request |
0430 0941
543,000 원 |
| Attachable printer (securely attached) with 1 roll of thermal paper and batteries |
0554 0570
875,000 원 |
| SoftCase (protects instrument from impact) with carrier strap, magnetic holder and probe holder |
0516 0401
214,000 원 |
SoftCase for attachable printer (protects printer from dirt/impact)
Protects from impact and falls |
0516 0411
102,000 원 |
System case (aluminium) for measuring instrument, probes and accessories
Probes in lid make it easy to find parts in case |
0516 0410
569,000 원 |
We recommend: DKD calibration certificate/Temperature
El. resistance thermometer, el. thermometer; cal. points selectable from -80 to +1000°C |
0520 0201 | |
|

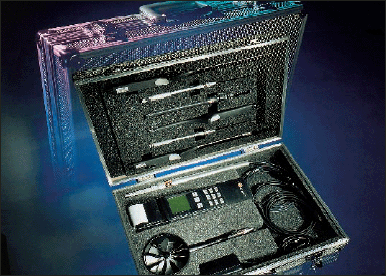
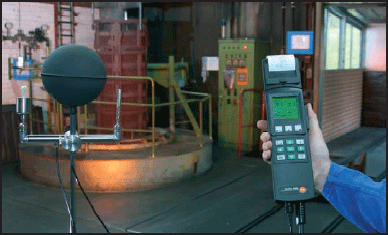
The specialist case for fast assessment of ventilation/air conditioning systems | Wet Bulb Globe Temperature
The professional set for assessing workplaces subjected to heat

Measure with testo 400 and WBGT probe

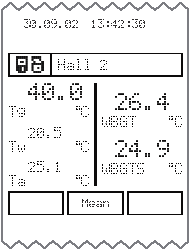
testo 400 on-site printout e.g. with attachable printer |

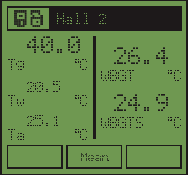
Calculated WBGT and WBGTS indices are displayed directly | |
The measurement task involves assessing workplaces, particularly those subjected to heat radiation:
The WBGT probe is used to determine the WBGT (Wet Bulb Globe Temperature) climate index in accordance with DIN 33403 and ISO 7243.
The WBGT index is used to determine the maximum allowable exposure time at workplaces subjected to heat.
Possible applications are e.g.:
- Steel industry
- Foundries
- Glass industry
- Furnaces
- Ceramics industry.
Heat radiation causes an increase in temperature based on:
- the thermal influence of the surroundings
- Work intensity
- Thermal transfer of clothing
- Duration of exposure.
If this burden is too high, there is a risk of a circulatory collapse, heat cramps or heat stroke. |
Three different temperatures are required in order to be able to calculate WBGT:
- Temperature of a naturally ventilated, moisturised thermometer (Tw), natural wet bulb temperature
- Globe temperature (Tg)
- Air temperature (Ta).
The calculation is carried out inside and outside buildings without solar radiation:
WBGT = 0.7 Tw + 0.3 Tg
Outside buildings with solar radiation:
WBGTS = 0.7 Tw + 0.2 Tg + 0.1 Ta
The testo 400 measuring instrument calculates indices and shows them in the display.
The measurement should be the following for standing work: 1.7/1.1/0.1 m and 1.1/0.6/0.1 m for sedentary work.
|

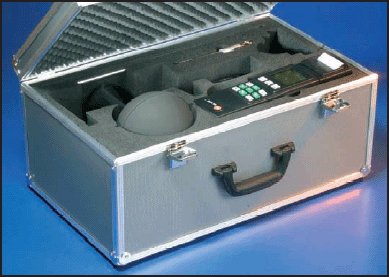
The WBGT case for fast assessment of workplaces |
|
| Recommended kit: |
Part no. |
| testo 400, multi-function measuring instrument, incl. battery, Li cell and calibration protocol |
0563 4001
2,537,000 원 |
| Wet Bulb Globe temperature probe to assess workplaces subjected to heat, in accordance with ISO 7243 or DIN 33403, incl. WBGT case |
0635 8888
ID No.
0699 4239/1 |
Attachable printer (securely attached) including 1 roll of thermal paper and batteries
Quickly prints readings on location |
0554 0570
875,000 원 | | The professional set for comfort level measurements and occupational safety and health
The thermal well-being of humans depends to a great extent on ambient air flow. Humans react sensitively to draughts. Draught air is the most common reason for complaints about climate.
Testo´s direction-independent comfort probe has been specially designed to analyse these draughts. When used together with the testo 400 reference measuring instrument, it is possible to set up a reading sequence and to
calculate the corresponding mean.
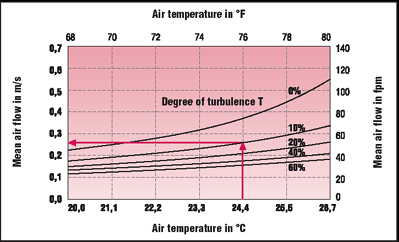
However, the mean air flow alone is not sufficient to assess the effect on people. The fluctuations in ambient air flow is also important. The degree of turbulence required in the respective standards and guidelines is a measure of this. It is also calculated automatically by the testo 400 reference measuring instrument.
Standards recommend that air flow is measured directly at the workplace at a height of 0.1 m, 0.6 m and 1.1 m (for seated persons) or 0.1 m, 1.1 m and 1.7 m (for standing persons).
Th maximum mean air flow depends on the air temperature measured and the degree of turbulence calculated in each case (see graphics). |
- Draught prevention in the workplace
- Measure ambient air flow in airconditioned rooms in accordance with DIN
1946 Part 2, ISO 7726
- Automatic calculation of degree of turbulence
(with testo 400)
- Fulfills the accuracy specifications of DIN
1946 Part 2, VDI 2080, ISO 7726 |

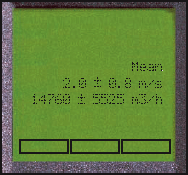
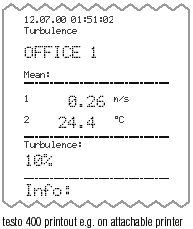
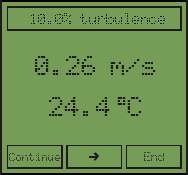
The normally time-consuming degree of turbulence calculation is carried out automatically by the testo 400 measuring instrument.
Example: air temp.: 24.4°C, turbulence: 10%
Degree of turbulence calculation: maximum mean air flow 0.26 m/s
 |

testo 400 display withcalculated degree of turbulence, mean air flow and air temperature | |
| Recommended kit: |
Part no. |
testo 400, multi-function measuring instrument, incl. battery, Li cell and calibration protocol
2 channel multi-function measuring instrument |
0563 4001
2,537,000 원 |
| Comfort level probe for measuring degree of turbulence levels, with telescope and stand. Fulfills DIN 1946 Part 2 or VDI 2080 requirements |
0628 0009
1,489,000 원 |
| Attachable printer (securely attached) with 1 roll of thermal paper and batteries |
0554 0570
875,000 원 |
We recommend:
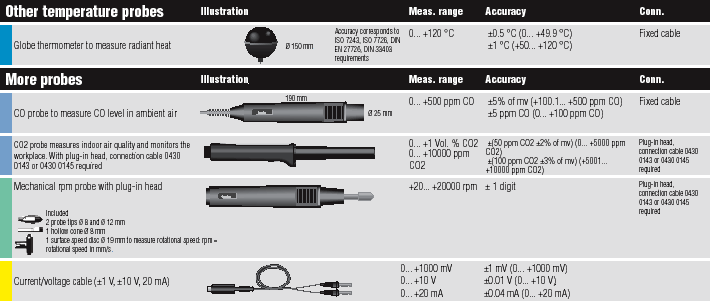
CO2 probe measures indoor air quality and monitors the workplace. With plugin head, connection cable 0430 0143 or 0430 0145 required
|
0632 1240
1,145,000 원 |
Cable, 1.5 m long, connects probe with plug-in head to meas. instrument
PUR coating material |
0430 0143
89,000 원 |
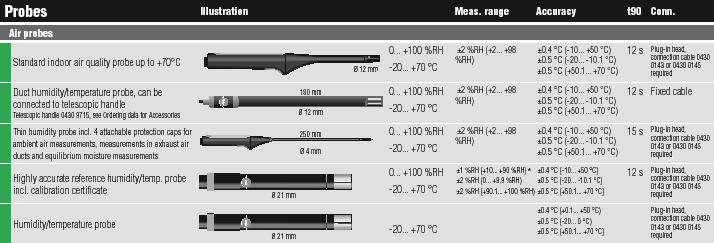
Standard indoor air quality probe up to +70°C
Measures all physical parameters in the Mollier diagram |
0636 9740
750,000 원 |
Quick-action surface probe with sprung thermocouple strip, measuring range
short-term to +500°C |
0604 0194
303,000 원 |
Cable, 1.5 m long, connects probe with plug-in head to meas. instrument
PUR coating material |
0430 0143
89,000 원 | |
|

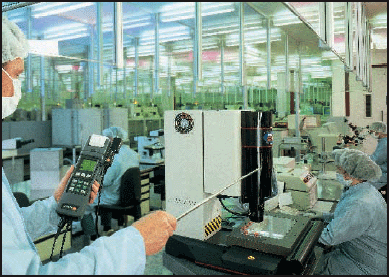
testo 400 set up with turbulence degree probe | The Pro Set for clean room systems

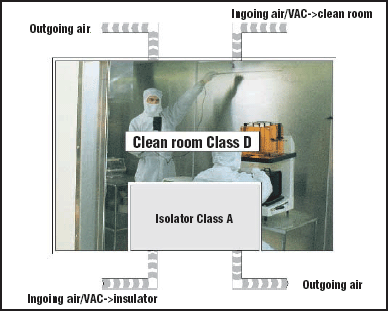
Example of layout of a clean room
 |
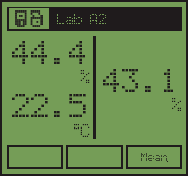
testo 400 display during the calibration of a stationary transmitter:
Left display half: Reference humidity probe Right display half: 4-20 output measurement
in a transmitter using current/voltage cable
(scaling 0-100%RH) | |
Defined process ambient conditions must be assured for
the qualification and validation of the high quality standards of production units in clean rooms.
Air exchange and the resulting air flow are linked directly to air temperature and air moisture. Specified air flows produce defined positive pressures which prevent the ingress of impurities from outside.
Testo's measurement technology has proven to be ideal for testing process ambient conditions.
With the testo 400 reference measuring instrument, you have the possibility of connecting 2 probes simultaneously. The measuring instrument can then
be used to monitor measurements on-site or for long-term measurements thanks to the integrated readings memory with capacity for 48,000 data.
Typical measurement tasks:
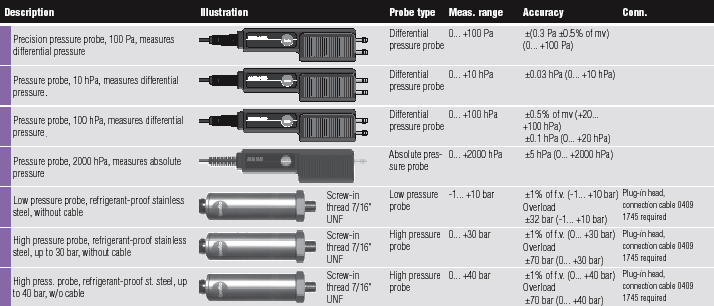
differential pressure monitoring using the 100 Pa probe
The testo 100 Pa probe with an accuracy of ±(0.3 Pa + 0.5 % of the reading) is the ideal solution.
Position dependencies are completely eliminated thanks to the revolutionary double membrane technology and fluctuations in temperature no longer have any influence on the measured result thanks to temperature compensation.
Accurate air temp. measurement
testo 400 achieves a system accuracy of 0.1°C and a resolution of 0.01°C when used together with the precision air probe (Pt100 Class B 1/10). |
Accurate air moisture measurement
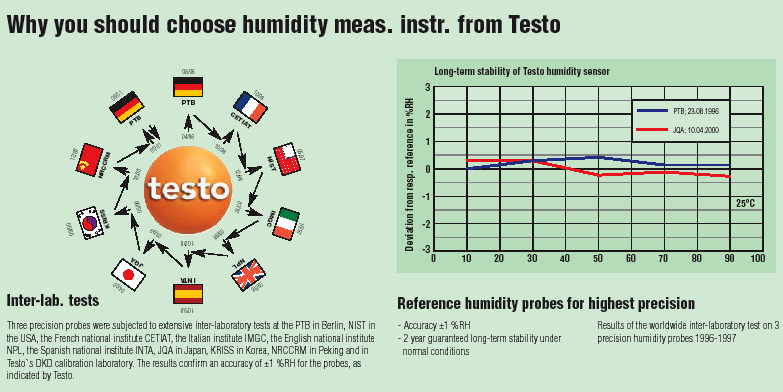
The task at hand is to monitor exactly the fluctuations in air moisture with an accuracy of up to ±1%RH. testo 400 sets new standards in terms of accuracy and long-term stability. The worldwide inter-laboratory test with the patented humidity sensor in leading, international institutes confirm the stated values.
Measurement of ideal air supply
testo 400, with its thermal, vane and pitot tube measurements, has all the technology available to measure air flow. A calibration accuracy from 0.5% of the reading is assured thanks to the first PTB accredited DKD laboratory for flow.
Function test on lab extractors
Regular testing of the air function can be carried out as a differential pressure or speed measurement in the ventilation connection above the extractor or at the sliding front opening. Based on DIN 12950 and DIN 12924, we can recommend the hot wire probe 0635 1041, vane probe Ø 100 mm 0635 9340 and the differential pressureprobes 0638 1345 / 0638 1445.
Stationary transmitters
The check is carried out using the m³/h
current/voltage cable (0 to 20 mA, 0 to 1 V, 0 to 10 V) and there is a possibility of
integrating additional parameters. |
 |
|
| Recommended kit: |
Part no. |
| testo 400, multi-function measuring instrument, incl. battery, Li cell and calibration protocol |
0563 4001
2,537,000 원 |
| Precision pressure probe, 100 Pa, measures differential pressure and velocities (in connection with Pitot tube) |
0638 1345
1,250,000 원 |
Precision air probe
Plug-in head, connection cable 0430 0143 or 0430 0145 required |
0628 0017
750,000 원 |
| Highly accurate reference humidity/temp. probe incl. calibration certificate Plug-in head, connection cable 0430 0143 or 0430 0145 required |
0636 9741
1,117,000 원 |
| Cable, 1.5 m long, connects probe with plug-in head to meas. instrument |
0430 0143
89,000 원 |
| Cable, 1.5 m long, connects probe with plug-in head to meas. instrument |
0430 0143 |
| Quick-action hot wire probe, Ø 10 mm, with telescopic handle, for measurements in the lower velocity range with direction recognition |
0635 1041
1,145,000 원 |
| Bendable vane probe (can be bent by 90°), Ø 100 mm, attachable to handle or telescopic handle, for measurements on ventilation outlets |
0635 9340
1,145,000 원 |
| Professional telescopic handle for plug-in vane probes, max. 1 m long, extension on request |
0430 0941
543,000 원 |
| Current/voltage cable (±1 V, ±10 V, 20 mA) |
0554 0007
380,000 원 |
System case (aluminium) for measuring instrument, probes and accessories
Probes in lid make it easy to find parts in case |
0516 0410
569,000 원 |
ComSoft 3 - Professional with data management
Incl. database, analysis and graphics function, data analysis, trend curve |
0554 0830
617,000 원 |
RS232 cable
Connects instrument to PC (1.8 m) for data transfer |
0409 0178
82,000 원 |
| We recommend: DKD calibration certificates for temperature, humidity, velocity, pressure (See Calibration) | | Technical data
| Probe type |
Vane |
Thermal |
|
|
|
| Meas. range |
0... +60 m/s |
0... +20 m/s |
|
|
|
Accuracy
± 1 digit |
See Probes data for system
accuracy |
±0.01 m/s
(0... +1.99 m/s)
±0.02 m/s
(+2... +4.9 m/s)
±0.04 m/s
(+5... +20 m/s) |
|
|
|
| Resolution |
0.01 m/s (for Ø 60/100 mm),
0.1 m/s (for remaining
probes) |
0.01 m/s
(0... +20 m/s) |
|
|
|
| Probe type |
Testo humid. sensor, cap. |
Pressure |
aw value |
|
|
| Meas. range |
0... +100 %RH |
0... +2000 hPa |
0... +1 aW |
|
|
Accuracy
± 1 digit |
See probe data |
Probe 0638 1345
Probe 0638 1445
Probe 0638 1545
Probe 0638 1645
±0.1% of mv
Probe 0638 1740
Probe 0638 1840
Probe 0638 1940
±0.2% of mv
|
See probe data |
|
|
| Resolution |
0.1 %RH
(0... +100 %RH) |
0.001 hPa
(0638 1345 probe)
0.001 hPa
(0638 1445 probe)
0.01 hPa
(0638 1545 probe)
1 hPa
(0638 1645 probe)
0.01 bar
(0638 1740 probe)
0.01 bar
(0638 1840 probe)
0.01 bar
(0638 1940 probe) |
|
|
|
| Probe type |
NTC |
Pt100 |
Type K
(NiCr-Ni) |
Type S
(Pt10Rh-Pt) |
Type J
(Fe-CuNi) |
| Meas. range |
-40... +150 °C |
-200... +800 °C |
-200... +1370 °C |
0... +1760 °C |
-200... +1000 °C |
Accuracy
± 1 digit |
±0.2 °C
(-10... +50 °C)
±0.4 °C
(-40... -10.1 °C)
±0.4 °C
(+50.1... +150 °C) |
±0.1 °C
(-49.9... +99.9 °C)
±0.4 °C
(-99.9... -50 °C)
±0.4 °C
(+100... +199.9 °C)
±1 °C
(-200... -100 °C)
±1 °C
(+200... +800 °C) |
±0.4 °C
(-100... +200 °C)
±1 °C
(-200... -100.1°C)
±1 °C
(+200.1...+1370 °C) |
±1 °C
(0... +1760 °C) |
±0.4 °C
(-150... +150 °C)
±1 °C
(-200... -150.1 °C)
±1 °C
(+150.1... +1000 °C) |
| Resolution |
0.1 °C
(-40... +150 °C) |
0.01 °C
(-99.9... +300 °C)
0.1 °C
(-200... -100 °C)
0.1 °C
(+300.1... +800 °C) |
0.1 °C
(-200... +1370 °C) |
1 °C
(0... +1760 °C) |
0.1 °C
(-200... +1000 °C) |
| Probe type |
CO2 probe |
CO probe |
Mechanical |
Current/voltage measurement |
Current/voltage measurement |
| Meas. range |
0... +1 Vol. % CO2
0... +10000 ppm CO2 |
0... +500 ppm CO |
+20... +20000 rpm |
0... +20 mA |
0... +10 V |
Accuracy
± 1 digit |
See probe data |
±5% of mv
(0... +500 ppm CO) |
(+20... +20000 rpm) |
±0.04 mA
(0... +20 mA) |
±0.01 V
(0... +10 V) |
| Resolution |
|
|
1 rpm
(+20...+20000 rpm) |
0.01 mA
(0... +20 mA) |
0.01 V
(0... +10 V) |
| PC |
RS232 interface |
Memory space in basic version: 128 kB corresponds to approx. 45,000 readings |
| Oper. temp. |
0... +50 °C |
Memory space, extended: 1 MB, corresponds to approx. 500,000 readings |
| Storage temp. |
-25... +60 °C |
Other features: automatic recognition of all connected probes |
| Battery type |
1.5 V AA |
Power supply: Battery/rech. batt., alternatively 8 V mains unit |
| Battery life |
18 h |
Battery life in continuous operation with 2 thermocouple probes |
| Weight |
500 g |
|
| Warranty |
3 years |
| |
| testo 400 |
- Testo의 새로운 프로페셔널 클래스
- 참조 측정 기기
Testo 400은 전문가와 숙련자들이 계측 작업을 간편하게 수행할 수 있도록 설계된
다기능 계측기입니다.
풍량,ASHRAE Speck의 최대 및 최소값을 산출합니다mV/mA 측정 입력은 트랜스듀서의
출력을 쉽게 확인할 수 있게 합니다. |
|
|
|
| |
|
| 기능 |
적용분야 |
정확도 ±0.1℃/℃의 온도
프로브는 조정을 위한 교정 기능을 제공
습도/로점, 완벽한 몰리어(Mollier)다이어그램 값
주변 레벨의 CO 및 CO2
압력, 압력차 및 절대 압력
가열식, 베인 및 피토관 프로브를 사용한 속도 계측
계측기의 로거 기능을 이용하여
장시간에 걸친 데이터를 날짜, 시간 및 위치와 함께로깅 |
풍량 계측 (cfm, m3/min, l/s)
난류(터뷸런스) 레벨 측정
참조값으로서나 올바른 피토관 계측을 위해 압력
(절대 압력)을 측정 | |
|
| 기술데이터 |
|
| 온도 |
| Pt100 |
| 측정 범위 |
-200 ~ +800 도 (-328 ~ 1472 도) |
| 시스템 정확도 |
최대 ±0.1도 / ±0.1도 (Class A, B) |
| 해상도 |
0.01도 (0.01도) |
| NiCr-Ni |
|
| 측정 범위 |
-200 ~ +1,370도 (-328 ~ +2498도) |
| PtRh-Pt |
|
| 측정 범위 |
0 ~ +1,760도 (32 ~ +3200도) |
| FeCu-Ni |
|
| 측정 범위 |
-200 ~ +1,000도 (-328 ~ +1832도) |
| NTC |
|
| 측정 범위 |
-50 ~ +150도 (-58 ~ +302도) |
| 시스템 정확도 |
최대 0.4도 (0.4도) |
| 습도 계측 |
|
| 온도 |
-30℃ ~ +180℃ (-22℃ ~ +356℃) |
| 측정 범위 |
0 ~ 100% RH |
| 시스템 정확도 |
최대 ±1.0 % RH |
| 압력 계측 |
|
| 측정 범위 |
±0.1 bar ?0.01 bar
2bar 10 bar 30 bar |
| 속도 계측 |
|
| 베인 측정 범위 |
0 ~ 60 m/s (0 ~ 12,000 fpm) |
| 가열식 측정 범위 |
0 ~ 20 m/s (0 ~ 4,000 fpm) |
| 피토관 측정 범위 |
0 ~ 10 mbar / 100 mbar
0 ~ 40 m/s / 100 m/s (0 ~ 8,000 / 20,000 fpm) |
풍량
(l/s, m 3 /min, m 3 /h) |
|
| 측정 범위 |
360.000 cfm (1 m 2 에서의 최대 산출값, 20,000 fpm 값) |
| CO 계측 |
|
| 측정 범위 |
0 ~ 500 ppm |
| 정확도 |
±5ppm |
| CO 2 계측 |
|
| 측정 범위 |
0 ~ 10,000 ppm
0 ~ 1 vol. % |
| 정확도 |
측정치의 ±5% of m.v. 또는 100 ppm |
| rpm 계측 |
|
| 측정 범위 |
0.333 ~ 333 Hz
20 ~ 20,000 rpm |
| 정확도 |
±1 자리 |
| 전류/전압 계측 |
|
| 측정 범위 |
0 ~ 20 mA / 4 ~ 20 mA
0 ~ ?0 V / 0 ~ ? V |
| 일반 기술 데이터 |
|
| 메모리 공간 |
|
| 기본 버전 |
약 7,500개의 측정값에 해당하는 15 kB |
| 확장 |
약 500,000개의 측정값에 해당하는 1 MB |
전원 공급
대체 사용 |
배터리/충전지
8 V 주전원 유닛 |
| 충전지 수명 |
18시간 (2개의 서머커플 프로브로 연속 동작) |
| 동작 온도 |
0 ~ +50 도 (32 ~ +122도)
단기 0 ~ +60도 (32 ~ +140도) |
| 보관/운송 온도 |
-25 ~ +60도 (-13 ~ +140도) |
| 무게 |
650 g (충전지 포함) 1lbs. 7 ozs. |
| 기타 |
- 연결된 프로브 자동 인식
- 업그레이드 가능(Testo 650, Testo 400)
- 데이터 관리를 위한 RS 232 인터페이스 |
| 보증 |
기기 : 3년
프로브 : 1년 | | | | |
|
|
 | |
 |
|
 |
|
이 상품에 대한 사용후기가 아직 없습니다.
사용후기를 작성해 주시면 다른 분들께 많은 도움이 됩니다. |
|
 |
|
 |
|
|
 | |
 |
|
 |
|
이 상품에 대한 질문이 아직 없습니다.
궁금하신 사항은 이곳에 질문하여 주십시오. |
|
 |
|
 |
|
|
|
|
|


